vegan

Quinoa Cookies

Vegan. Gluten-free. Dairy-free. Absolutely delicious.

These quinoa cookies are quick to make, simple in its ingredients, easy to adapt and on the healthier side as far as treats go. If you are looking for a sweet treat that can double up as a quick grab and go snack with your morning coffee – these cookies are an obvious choice. You might want to opt out the chocolate for some dried fruit but in my opinion, a hint of chocolate is always welcome (especially when it’s the right chocolate). 🙂

These cookies are nutty in flavour with a touch of sweetness and the quinoa adds a slight crunch, (which I love). Next batch I’m going to try with a double up on the coconut, minus the chips – adaptations are just that easy with this one. I’d love to hear how you might switch this dish up.

Now for the real sell on these sweet bites. The plant based source Quinoa is a complete protein; packed with iron, zinc, B-vitamins, magnesium, phosphorus, potassium, calcium, vitamin E and fibre. Adding this key ingredient to your baking is a big win over the traditional empty ingredients that go into the typical cookie. Plus, for those fighting allergens often related to our favourite baked goods (wheat/dairy), here is something for you. Check out this dish –

Quinoa Cookies (yields 20-24)

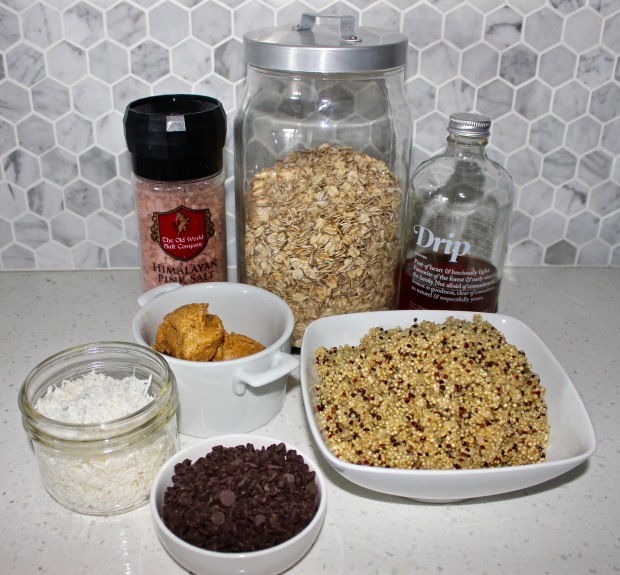
  • 2 cups cooked quinoa (let it cool before using)
  • 2/3 cup natural peanut butter (chunky or smooth)
  • 3 tablespoons pure maple syrup
  • 1/4 teaspoon himalayan sea salt
  • 3/4 cup gluten-free rolled oats
  • 1/2 cup unsweetened, shredded coconut
  • 1/2 cup dairy-free chocolate chipsIngredients - Quinoa Cookies
  1. Preheat oven to 350 degrees
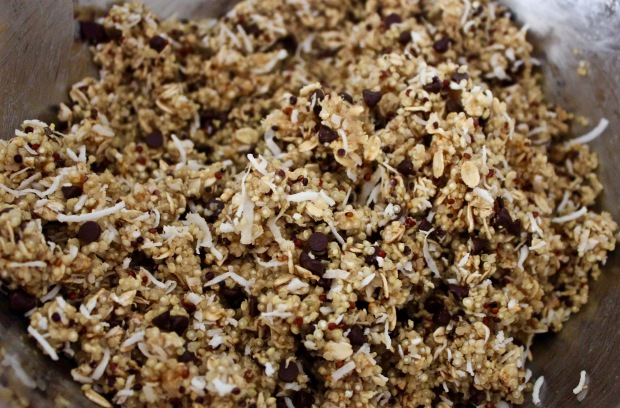
  2. Combine quinoa, peanut butter, maple syrup, salt, and oats in a large mixing bowl. Using an electric mixer on low speed, combine ingredients well
  3. Stir in coconut and chocolate chips
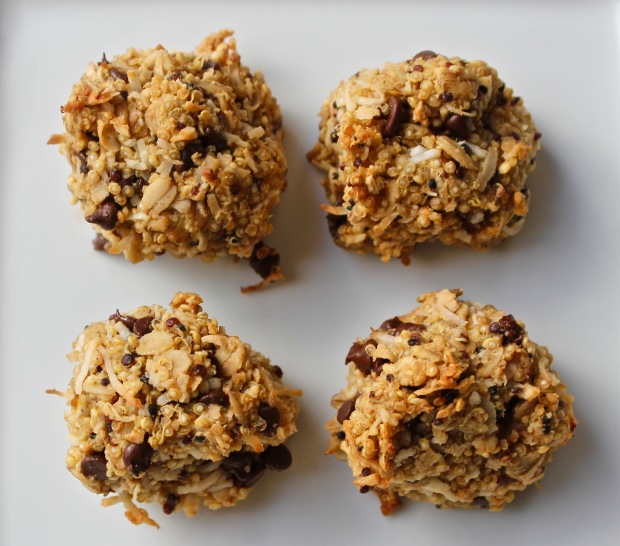
  4. Scoop and mold dough into round, tablespoon-sized cookies onto baking sheet
  5. Bake for 20-25 minutes, until bottoms are nicely browned
  6. Let cool before storingQuinoa Cookie BatterQuinoa Cookies

Keep Sweet. xx

Lentil & Tomato Soup

A soup in minutes, a soup using pantry staples, a soup that will still wow you with it’s simplicity.

Zuppa di Lenticchie e Pomodori  is a beautiful hearty soup made with ingredients you might just have on hand. I always keep canned staples like lentils and plum tomatoes in the pantry to make life easier in those moments when we are crunched for time or looking for something quick and comforting. David Rocco is a culinary expert who lives ‘the dolce vita’, ‘the sweet life’ with being present in moments in life that bring joy. The simple joys. You see this shine through in his books and in his cooking. I think that’s why I love picking up his book to be inspired in the kitchen because you feel this morale in his style and his creations and it leaves you feeling at ease. It reminds me that cooking doesn’t need to be complicated.David Rocco

So here is one of my favourite go to recipes from Mr. David Rocco. It’s an dish that I just had to share, to make life easier and give you more time to take pleasure in the simple joys of the sweet life.

Lentil & Tomato Soup (yields 2-4 servings)

  • 4 tbsp extra-virgin olive oil
  • 2 cloves garlic, chopped
  • 1 bunch of fresh flat-leaf parsley, chopped
  • 2 fresh chilli peppers, chopped
  • 1 can (28oz) peeled plum tomatoes
  • 1 can (19oz) lentils, rinsed
  • 5- 8 basil leave, chopped
  • himalyan sea salt and ground pepper, to taste
  • water (to reach desired consistency)

Ingredients - Lentil & Tomato Soup

  1. In a saucepan, heat olive oil over low-medium heat. Add garlic, parsley and chili peppers and sauté for 5-7 minutes
  2. Add plum tomatoes and juices from the tin. With the back of a wooden spoon, break up the tomatoes into little chunks
  3. Add lentils, salt and pepper. Add water and allow to cook for approximately 15-20 minutes until the soup has thickened
  4. Stir in chopped basil and cook for another 5-8 minutesLentil and Tomato Soup

Vivere la dolce vita. xx


The Perfect Matcha

Who said you couldn’t have your greens in a warm and cozy cup… Ok not quite… But a good cup of Matcha offers many benefits to help kick off your day. This miracle elixir has been around for over a thousand years and is ever growing in popularity. While the best can be found at small Chinese tea shops, Matcha is easily available at most major tea and coffee retailers, when you are looking for convenience. I’ll often get my fix at Starbucks if needed and on the go. However, nothing beats sitting back and relaxing with a warm cup of greens before starting the day. Finding that moment of peace and calm in a delicious cup is beyond comforting.Matcha

It’s well known that Matcha is a ‘superfood’ we should not ignore. There are loads and loads of benefits that should be well noted and celebrated with each latte you make. Here are a few that are top in my books –

  • high in antioxidants, exponentially more than any other ‘superfood’
  • loaded with catchin EGCg, which is most powerful with cancer fighting properties
  • L-Theanine helps in calming, aiding in relaxation and meditation efforts
  • L-Theanine also produces dopamine and serotonin which enhance memory and concentration
  • a clean energy boost from combined nutrients vitamin C, selenium, chromium, zinc and magnesium
  • rich with chlorophyll, naturally detoxifying the body
  • boost to one’s metabolism, helping burn calories
  • natural antibiotic properties that fortify and stregthen the immune system
  • health properties that help fight heart disease, improve cholesterol and lower blood sugar

Making the perfect Matcha is kind of a no brainer, but here you’ll find a few of my special touches. This recipe yields 2 servings.

Matcha & Coconut Milk

2 teaspoons of Matcha, 1 1/2 cups of unsweetened almond coconut milk, 1/2 cup water, drizzle of maple syrup or coconut agave syrup.
Matcha

  1. Whisk the Matcha with a tbsp of water to get rid of lumps and clumps
  2. In a small saucepan, bring the milk of your choice to a simmer over medium heat
  3. Boil water in kettle
  4. Add Matcha and sweetener to simmering milk
  5. Fill mug with half water, half Matcha milk
  6. Enjoy!

Matcha Latte

Matcha On. xx

Tropical Greens

Sweet and delicious, this tropical smoothie will have you throwing back the greens. I don’t often incorporate pineapple in my green shakes due to the higher sugar content but this combination makes for a nice change and is a welcomed option for those starting to drink more green shakes/juices. This combination is loaded with tons of nutritional properties from our beloved Kale and Hemp Hearts (as you have learned about in my previous posts or can now catch up on), but we also have some added perks from the funky pineapple.

This fruit is so deliciously sweet that we often forget how nutritious they actually are. Yes, they are higher in sugar, but they do contain high amounts of vitamin B & C, manganese, dietary fibre, thiamin, and bromelian (which in my book, offsets the negatives of sugar. And we are pairing it with Kale and Hemp Hearts here).

These vitamins and minerals make pineapple a great source of energy and a defensive antioxidant. Eating pineapple (in moderation) can help:

  • fight heart disease
  • reduce joint pain
  • strengthen bones and connective tissue
  • support digestive health
  • reduce inflammation
  • increase metabolism

Multiple reasons for you to check this one out. Here’s the dish –
Tropical Greens

Tropical Greens (yields 4 servings)

  • 3-4 cups kale
  • 1 banana
  • 1-2 cups pineapple
  • 3-4 tbsp hemp hearts
  • 2 cups water

Combine all ingredients in blender and blend until smooth. Add water until desired consistency.

Tropical Greens

Je suis un ananas. xx


Banana Bread Granola

I am basically obsessed with the My New Roots: Inspired Plant Based Recipes for Every Season cookbook. Sarah Britton is a true original when it comes to edible inspirations, with an insight on Holistic Nutrition that is thought-provoking and enlightening. This book isn’t just about the pretty pictures (although they are definitely mouth-watering to look at). Sarah breaks out her recipes by season and by dish category – which I absolutely love! Although I am totally guilty of jumping all over, since I want to try them all!

This weekend I tried out her Chunky Banana Bread Granola and I can’t believe I hadn’t thought to add in banana’s to my granola sooner – what a game changer for my granola making days. For one that loves banana bread but looks for a healthier alternative with added nutrients – this is it!

Using banana’s as part of your binding agent will change up any of your go-to granola recipes. Sarah’s recipe is spot on and needs no modification, unless you want to add a few alternate ingredients or use what you have on hand. Just don’t skip out on the Banana – this is the absolute key! My personal recommendation for add-in’s are chia seeds, raw pumpkin seeds, crushed raw almonds or chocolate chips for a treat! What would you add? Check out this amazing breakfast dish-

Banana Bread Granola (yields 9 cups)

  • 3-4 very ripe bananas
  • 1/2 cup pure maple syrup
  • 3 cups rolled oats (gluten-free)
  • 1 cup  buckwheat groats
  • 1 1/2 cups unsweetened large coconut flakes
  • 1/2 cup raw sunflower seeds
  • 2 teaspoons ground cinnamon
  • 1/2 teaspoon fine sea salt
  • 1 cup whole raw walnuts, roughly chopped
  1. Preheat the oven to 350°F. Line 1 or 2 baking sheets with parchment paper.
  2. Melt the coconut oil in a small saucepan over medium-low heat. Pour the melted oil into a food processor or blender, add the bananas and maple syrup, and blend until smooth.
  3. In a large bowl, combine the remaining ingredients – rolled oats, buckwheat groats, coconut flakes, sunflower seeds, walnuts, cinnamon, salt, etc.
  4. Pour the maple syrup mixture over the dry mixture and gently toss to coat.
  5. Divide the mixture between the 2 baking sheets and press it firmly with the back of a spatula to ensure that the mixture is compact and even. Bake the granola for 20 minutes, until it’s beginning to brown.
  6. Remove the baking sheet from the oven and use a spatula to flip the granola over in large sections. Return it to the oven and flip it every 5-8 minutes, making smaller chunks each time, until golden, 15 to 25 minutes more. The granola should be dry and crisp.
  7. Set the granola aside at room temperature to cool. Do not stir the granola until it is completely cool so it will set into chunks.
  8. Store in an airtight container at room temperature for up to 1 month – if it lasts that long!! 🙂

Banana Bread Granola

Go BANANAS! xx