Snacks & Appy’s

Superfood Energy Balls

These superfood energy balls are loaded with all the goodness. From heart-healthy oats, natural almond butter and medjool dates as a base, to loading in any of your other superfood hero’s. Chia, pumpkin seeds,and  hemp hearts are my usual go to’s when looking for a big nutritious punch. To sweeten up this snack, add in some antioxidant berries (in this recipe I used a great cherry, cranberry, blueberry mix) or if you want to indulge, add in some dark chocolate chips.

These balls come together in a quick 10 minutes or so and you can easily adapt to your liking. I’ll share my other go to recipe soon!

These are a great snack on the go and make for the perfect pre or post workout snack, plus they will leave you feeling guilt-free if you’re just looking for something to satisfy your sweet tooth.

Superfood Energy Balls (yields ~12)
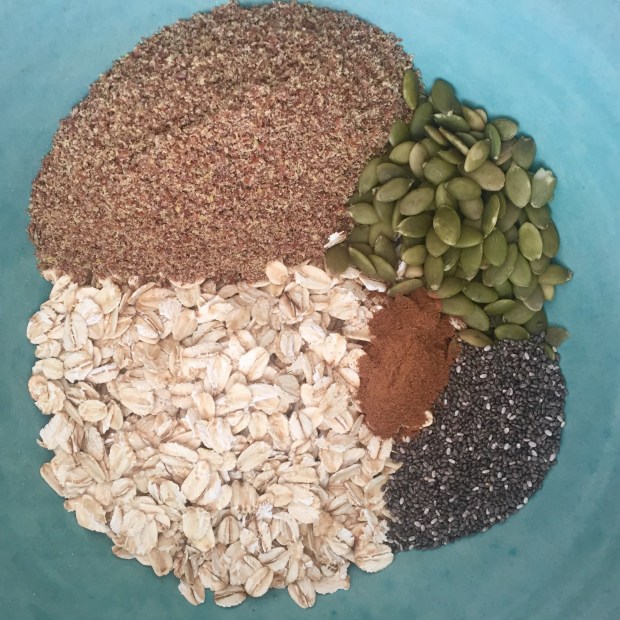
  • cup old fashioned oats
  • 3/4 cup almond butter (or your choice of nut butter)
  • 1/4 cup ground flax seed
  • 2 tbsp chia
  • 2 tbsp raw pumpkin seeds
  • tbsp favorite dried fruit
  • medjool dates, pitted
  • 2 tbsp maple syrup (honey or brown rice syrup works well too)
  • 1/2 tsp cinnamon

FullSizeRender (39)

  1. Combine dates, almond butter, dried berries and maple syrup in food processor and pulse until dates are fully chopped and everything is combined
  2. In a bowl mix together oats, flax seed, chia, pumpkin seeds, and cinnamonFullSizeRender (41)
  3. Add date and almond butter mixture and stir until fully combined. If the mixture is not quite sticky enough for you (this can vary depending on the nut butter you use) just add a bit more maple syrup or nut butter into the mixture
  4. Roll into 1 inch balls. Place balls into an airtight container and store in the fridge or freezer for snacking throughout the weekFullSizeRender (40)

Snack on! xx

Baba Ghanoush

We have eggplants upon eggplants this summer and I have been running out of ideas on what to do with them.  I’m not the biggeest eggplant fan and am quite picky with how I like them, which makes it very challenging when you have a crisper full of them in the fridge. Of course I love them smothered in sugo and layered with cheese for a delectable Eggplant Parm, but I can’t eat that every day. Well, maybe I could, but I won’t. 🙂

High in dietary fiber, copper, vitamin B1 + a load of other nutrients, I really want to love this veg and not see them go to waste. I’ve put on my creative hat and dreamt up a batch of Baba Ghanoush and it’s real good! A recipe that’s better for you than what you would find at your local grocer, without all the extra’s, like mayonaise, sour cream, corn starch etc.

Eggplants

Creamy, tangy, savoury and slightly sweet; this recipe makes for a perfectly balanced dip. Simple in it’s ingredients and light on the extras, this dish packs loads of flavour and doesn’t compromise the nutritional value.

Baba Ghanoush

  • 1-2 eggplants
  • 1-2 lemons
  • 2-3 garlic cloves
  • 2-4 tbsp tahini
  • 2-4 tbsp olive oil
  • Himalayan sea salt
  • pepper

Optional: fresh herbs or chilli peppers, for some extra flavour.

Eggplants Roasting

  1. Preheat oven to high broil  and position a rack at the top of the oven.
  2. Slice your eggplant into 1/4 inch rounds, sprinkle with sea salt. Drain any excess liquid by placing slices in a colander  for 10 minutes. Rinse slightly and pat dry between two towels.
  3. Arrange on a baking sheet and drizzle with olive oil and a pinch of Himalayan sea salt.
  4. Roast for 10 minutes. Flip rounds and roast for another 5-10 minutes. Roast until the eggplant is softened and golden brown.
  5. Remove from pan, wrap the rounds in foil to lock in moisture – wait 5 minutes.
  6. Peel away the skin of the eggplant and add flesh to a blender/food processor.
  7. Add lemon juice, garlic, tahini, a pinch of salt and pepper. Mix until creamy.
  8. Taste and adjust seasonings as needed.
  9. Serve with pita and/or pita chips and veggies. Will keep covered in the fridge for several days.

Roasted Eggplants

Baba Ghanoush

Happy Dipping! xx

Nuts & Bolts

The Christmas tradition of munching on Nonna’s homemade nuts and bolts pre-dinner is one that I will continue to carry on. This recipe is one that has been around for decades (as you can see in the picture below) and a fan favourite to all. I’m not at all a cereal fan but this combination seasoned and baked to perfection is seriously addicting! Don’t say I didn’t warn you. 🙂

It has always been one of my favourite snacks for the holidays, simply because it’s delicious and of course tradition.Nuts & Bolts RecipeCheerios, Shreddies, peanuts, pretzels and Chex are perfectly combined; however the great thing is you can switch up the ingredients any way you desire and you’ll still come out on top! But let’s be real Chex makes this mix.Ingredients - Nuts & BoltsSimple in its ingredients, this easy snack doesn’t even come close to the party mix you can buy from your local grocer. While plain and simple in its parts, let’s not be fooled, these Nuts & Bolts aren’t exactly healthy. Unfortunately, the boxed and processed cereal are not as wholesome as we hope and the butter component is obviously less than ideal. Even if trying to find a healthier alternative (i.e.- earth balance instead of butter) no pound substitute of anything is that much better. So remember moderation and consider it an indulgence. After all it is the Christmas season.Nuts & BoltsThis recipe will stock you for the holiday season and all the parties you may be hosting, but you will also have ample supply to package up and gift to friends, family, co-workers and/or hosts of holiday parties. After all, it is 3+ boxes of cereal combined. 🙂

Nut & Bolts

  • 1 box rice CHEX
  • 1 box Cheerios
  • 1 box Shreddies
  • 1 bag Pretzels
  • 2 cups unsalted peanuts

Seasoning

  • 1 lb unsalted butter, melted (or substitute margarine, earth balance)
  • 1 tablespoon Worcestershire sauce
  • 2 tablespoon garlic powder
  • 1 tablespoon celery salt
  1. Preheat oven to 250 degrees.
  2. Combine all of the snack mix ingredients in a large pan.
  3. Melt butter in saucepan on low-medium heat. Add in seasoning ingredients and whisk until well combined. Pour slowly over snack mix, stirring as you go, to coat evenly. Continue stirring until snack mix is well coated with seasoning. Bake for 2 hours, stirring every 30 minutes. Let cool, then serve or store in an airtight container or ziplock bag.

Get Nutty. xx

Sweet Pea Crostini

I know I am stretching it with this one as we hit mid-Fall but this dish is too good not to share and is our one last grasp at the summer season. After all, crostini is welcomed any time of year – right? 🙂  This vibrant refreshing spread might be the perfect addition to that gorgeous Holiday spread full of rich indulgences. It’s simple in its ingredients and can be thrown together in a matter of minutes. No real measurements required, it’s pretty foolproof. Here’s the dish-

Sweet Pea Crostini

  • baguette
  • peas
  • mint
  • garlic
  • olive oil
  • balsamic vinegar
  • salt
  • pecorino
  1. Slice baguette, brush with olive oil and rub with garlic clove
  2. Toast baguette in the oven at 350°F for 10 minutes each side or until golden
  3. Blanch fresh peas for 2-4 minutes
  4. Drain peas, season with salt, olive oil and mash with fork, until desired consistency (you can also blend for a smoother mash)
  5. Mix in tbsp of mint and shredded pecorino to mixture
  6. Top toasted baguette with pea mash, some more pecorino, mint and drizzle with balsamic

Sweet Pea Crostini

PEAce. xx!

The Art of Charcuterie

As many of you may have noticed, I am not the biggest meat lover out there. Which is kind of ironic, considering our whole beef jerky venture (find out more here). I’m not labeled vegan or vegetarian, but meat just isn’t my thing, it never has been. I rarely crave it, I don’t really care to handle it and there are always other options that I prefer. However, when it comes to certain combinations and dishes, I will not turn away. Especially if it’s of high quality and beautifully displayed. 🙂

Admittedly, I don’t have a knack with pulling together a beautiful platter full of meats. I do an okay job, but I definitely overthink it. Give me cheese, antipasto, nuts, fruit, and I can pull off a killer board!  But mainly meats  – I just don’t have the jazz and often hand this one over when I can.

With that being said, my wonderful friend Cyrus Cooper has the magic touch and easily throws together the best of the best in minutes. So I easily had him throw together his dish on how to get that beautiful looking spread. Prepared to be inspired. Here’s his dish:

Charcuterie

Charcuterie….

Its not just cured, smoked or dried meat. Its art.

It takes time, patience and love to prepare correctly. It must be handled well, sliced to the correct thickness and enjoyed with the best and most simple ingredients.

In this case we used proscuitto, salami, soppressata, bresaola and a side of beef jerky. When preparing this dish its of utmost importance that you have a nice thick wooded board to place the ingredients on, a large cutting board will do.

First, lay out all your meats, cheeses, spreads, nuts, olives etc on the counter. Ensure you board is clean. And then.. the secret… Don’t over think it. Let your hands guide you and the creativity will ooooze.

Work in a vertical method and try to mix the levels of flavours so there is a balance. For example put the olives closer to the spicier meats and be sure to have a sharp cheese, a soft cheese. Mix in variety but don’t overdo it.

Remember, if you make a mistake, don’t worry, only you will know. Have fun and pick one or two simple garnishes to place on top. This time around we used fresh aromatic herbs from the garden which added a sweet pop of colour.

The key is transport yourself to Italy and let your hands do the work.

Charcuterie

Buon Appetito! xx