simple eats

Socca with Caramelized Onion, Asparagus & Micro Greens

This was my first time trying to make Socca and it was a success! A high protein gluten-free traditional Provencal flatbread topped off with some favourite ingredients. This recipe was seriously a hit and I’m thinking it may be a new at home pizza crust alternative! It is simple to cook, light and crisp with a delicious nutty flavour that will go with just about any topping. Made from chickpea flour, Socca ends up being a great source of protein, folate, iron and magnesium with all that yummy starchiness flavour.

This variation was inspired by Sarah Britton’s My New Roots recipe. Personally, I’m not a huge dill fan and opted to use what I had on hand to make this recipe come to life. Unfortunately, I didn’t get the best pictures because I was ravenous and dug into this beautiful dish too soon. Hope you enjoy!Socca with Carmelized Onion, Asparagus & Sprouts

Ingredients:

  • 2-3 medium sweet onions
  • 2 tbsp of coconut oil
  • himalayan sea salt
  • 2 teaspoons of balsamic vinegar
  • 2 bunches of asparagus (all green, or add in white or purple to jazz things up)
  • 1 cup of radish, arugula, ruby mustard micro greens or your choice of sprouts
  • 2 oz. goat feta
  • cracked black peppers
  • olive oil to garnish

Socca Ingredients: (makes 4-6)

  • 1 cup chickpea flour
  • 3/4 tsp himalayan sea salt
  • 1/2 tsp cracked black pepper
  • 1 1/4 cup warm water
  • 3 tbsp coconut oil, plus extra for cooking crepes
  1. To make the socca batter, sift the flour, salt and pepper in a large bowl. Whisk in warm water and oil, then let it sit, covered, for at least 30 minutes. Note- This can even sit all day.
  2. Over high heat, melt some of the oil in a large pan. Once it’s very hot, pour in one quarter of the batter and tilt the pan so it coats the base evenly. Cook for 5-8 minutes, until bubbles form on the surface and the batter turns from shiny to opaque, then flip over and cook for a few minutes, until browned. Remove from the pan and set aside under a tea towel to keep warm. Repeat with the remaining batter.Socca
  3. For the topping, heat coconut in a large pan, add the onions and salt, and stir to coat. Cook over medium heat, stirring occasionally. When the pan is dry, add the balsamic vinegar. Cook for 20-25 minutes, or until the onions are golden and caramelized, then transfer to a bowl.Carmelized Onion
  4. Preheat a grill pan over high heat. Rub the asparagus with the remaining oil, then add them to the pan and cook, for 5-10 minutes, turning once, until tender and slightly charred.
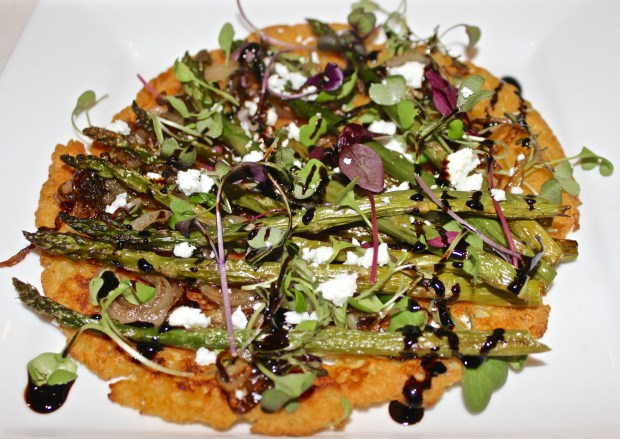
  5. To serve, cover each warm socca with the caramelized onions, asparagus, sprouts and feta. Season with salt and pepper and drizzle with balsamic vinegar.Soccer with Asparagus, Carmelized Onion & Sprouts

Dig in! xx

Parsnip Noodles with Roasted Butternut Squash & Kale

Happy Monday Friends! Hope you all had a beautiful weekend. 🙂

With the New Year already off to a busy start, I am trying to be more prepared when it comes to meals. Sundays are all about planning and prepping, freeing up extra time during the week.

Tonight’s dish was all about combining simple ingredients that are robust in flavour. At first glance, it looks like it probably takes a lot more time than it does. I promise you, that if you are prepared and know the recipe ahead of time, it is smooth sailing!

I don’t cook with parsnips often but am trying to incorporate them more to keep things interesting. This juicy nutty root veg is rich in healthy properties. From phyto-nutrients, vitamins, minerals and fibre. Plus it’s low in calories, fat, sodium and naturally cholesterol-free. Not to mention, super versatile when it comes to consumption!

Need more convincing? Check out these percent daily values:

Parsnip Nutritional Information

Now on to the deliciousness of tonight’s dish. This Parsnip noodle recipe comes from one of my favourite places to be Inspiralized – the definitive resource for cooking with a spiralizer. A few minutes exploring around Ali’s site and you’ll instantly be inspired by her wonderful and beautiful creations. This spiralized parsnips with roasted butternut squash and kale had me dancing in my kitchen with excitement, I was so inspired to give it a try.Parsnip Noodles with Roasted Butternut Squash & Kale

Easy to make, this recipe is really 3 simple components + a couple dashes here and there. Basically you just have to roast the squash, spiralize and cook the parsnips and wilt down the kale. Pretty basic steps. From here all you have to do is dress it up! (more details below on that). 🙂

Parsnip Noodles with Roasted Butternut Squash & Kale (yields two servings)

  •  1 cup cubed butternut squash
  • 1 tablespoon + 2 teaspoons of extra virgin olive oil, divided
  • himalyan sea salt and cracked black pepper, to taste
  • ½ teaspoon paprika
  • 4 parsnips, peeled and spiralized
  • 2 cups chopped kale (curly or laminate)
  • 2 garlic cloves, minced
  • crumbled feta to top (optional)
  • red pepper flakes, to topIngredient List
  1. Preheat the oven to 400 degrees. In bowl, toss butternut squash with 2 teaspoons of olive oil and season with salt, pepper and paprika. Toss to combine and once oven is preheated, lay squash on baking sheet and roast for 30-35 minutes or until tender.
  2. Ten minutes before the squash is done, place a large skillet over medium-high heat and add in the rest of the olive oil. Add in the parsnip noodles and let cook for 5-7 minutes or until cooked through. Transfer the parsnip noodles to a plate.
  3. In same skillet, add in the garlic, sauté for a 2 minutes and add in kale. Let cook until wilted, about 5 minutes and then add in the parsnip noodles and toss.
  4. Divide onto two plates and top with butternut squash, feta (optional) and the red pepper flakes.

Dive in! xx


Glowing Green Smoothie Bowl

Despite the wicked snow storm we were having early this morning, I had a bit of extra time and was feeling inspired. Since we rang in the new year, I’m finding muse in all the social sharing that is taking place with everyone’s new healthy 2016 regime – there have been some beautiful creations posted out there. With that being said, I wanted something different than my typical blend of fruits and veggies.

I recently organized my spice/toppers/baking/coffee/tea cupboard (yes this a thing haha) so I knew I had a handful of delicious add-in ingredients. So I decided to get creative and jazz up my smoothie with something beautiful and even more filling – a smoothie bowl!

I took some of my favourite toppers/ingredients – chia seed, coconut, hemp hearts, and strawberries and topped them onto my trusted Glowing Green Smoothie recipe (limit the water part to keep it on the thicker side).

What a simple and gorgeous dish to start off the morning – it definitely brightened my day!Glowing Green Smoothie Bowl

Be creative. xx

Sriracha Buffalo Chicken Wings

Surprisingly so, a weakness of mine, is a love of chicken wings. Not so much for the chicken but for the delicious sauce that ensues each pound (so bad- I know haha). I most recently discovered an at home oven-fried method to get the crispy crunch of your restaurant style fried wing and an easy to make Sriracha buffalo sauce that is bomb, courtesy of Honestly Yum (and really they are!)

The trick is to get the skin of the wings as dry as possible before baking at a high heat. This recipe I discovered uses baking powder to help crisp up the skin to that perfect golden crunch, which really works!

To sauce up your wings, Sriracha, cilantro and jalepeno combine for an extra spicy twist to the classic buffalo wing. These three ingredients together make a killer combo. I’ve tried several sauces for these oven-fried wings, but this one is by far a favourite in our household. Here’s the dish –

Chicken Wing Ingredients:

  • 4 pounds of chicken wings
  • 1 tablespoon of baking powder
  • 1 tablespoon of himalayan sea salt

Sriracha Buffalo Sauce Ingredients:

  • 1 cup of Sriracha
  • 6 tablespoons of unsalted butter
  • 2 jalapenos, thinly sliced
  • 1 small bunch of cilantro, roughly torn

Pat dry the wings with paper towels. Combine salt and baking powder in a bowl and toss wings to coat. Arrange on a baking rack on top of a baking sheet. Leave wings out for at least an hour to dry out the skin. To speed this up, next to a window or fan can help.

Preheat the oven to 475 degrees with the rack placed at the top of the oven. Bake for 20 minutes, flip, bake for another 15 minutes, until golden brown.

To prepare the wing sauce, melt butter and Sriracha together in a small pot until simmering. Pour into a bowl and toss hot wings in the sauce. Add jalapeños and cilantro and toss.

Pair with blue cheese dressing with extra blue cheese crumbled within and your wings are ready!

Sriracha Chicken Wings

Keep it Spicy! xx

Cauliflower Chickpea Tacos

Cauliflower is seriously underrated and often overlooked. I’m hear to tell you it’s not! It’s neutral flavor and versatility makes it an ideal choice to spice up, season and prepare to exactly how you like.  Not to mention it’s low in cost and has great nutritional content.

This cruciferous vegetable is an excellent source of Vitamin C, K, B6, fibre, folate, pantothenic acid,and manganese. Low in saturated fat and cholesterol, cauliflower is also a good source of protein, thiamine, riboflavin, phosphorus, and potassium. All these powerful properties help reduce the risk of cancer, most notably lung, colon, breast, ovarian, and bladder. So time to load up on this veg!

These cauliflower chickpea taco’s are incredible. I recently was introduced to this amazing meatless dish a couple weeks ago and I’ve made it several times since. It’s super easy, delicious, and the cost per meal is ridiculous. Originally found on She Likes Food (Yea I do!)

Cauliflower Chickpea TacosTaco Filling:

  • 1 head of cauliflower
  • 1¼ cup of cooked chickpeas
  • 1 teaspoon olive oil
  • 10-12 corn tortillas or desired shell (I’ve used lettuce wraps, which are super delish!)

FillingSeasoning:

You can adapt the seasoning based on what you might have on hand in  your spice cupboard – be inspired. 🙂

  • 1 teaspoon cumin
  • 1 teaspoon paprika
  • 1 teaspoon garlic powder
  • 1 teaspoon onion powder
  • 1 teaspoons salt
  • 1 teaspoon chili powder
  • 1 teaspoon dry mustard
  • ½ teaspoon smoked paprika
  • ¼ teaspoon black pepper
Coleslaw:
  • 1 14 ounce bag of cole slaw mix or 6 – 7 cups of thinly chopped cabbage and carrots
  • ½ cup of veganasie, mayonnaise or miracle whip salad dressing
  • ½ teaspoon dijon mustard
  • 1 teaspoon pure maple syrup
  • 1½ teaspoon apple cider vinegar
  • ¼ teaspoon celery salt
  • 1 pinch black pepper
  • Juice of one lime

ColeslawFilling

  1. Pre-heat oven to 375 degrees F.
  2. Prepare slaw: In a medium sized bowl add all of the slaw dressing ingredients. Mix ingredients together until a creamy sauce has formed. In a large bowl, add the cabbage mixture and pour dressing over. Mix until everything is combined. Place in the refrigerator until ready to use.
  3. In a small bowl add all of the seasoning ingredients and mix together.
  4. Separate all of the cauliflower florets and chop them into bite size pieces. Place florets and chickpeas onto a large sheetpan and drizzle with olive oil and sprinkle with seasoning. Toss everything together with your hands so that cauliflower and chickpeas are coated with spices. Place the sheetpan in the oven and bake for about 25-35 minutes (flipping occasionally).
  5. If desired, warm up corn tortillas in the oven. Add about ¼ cup of cauliflower and chickpeas to each taco and top with a few tablespoons of slaw. Top with your favourite toppings if you desire – I love adding avocado here!

Cauliflower Chickpea Tacos

The next best thing about this dish, is the leftovers! Warm up the filling the following day and use it as a salad topper – delish!

Keep Calm & Taco On. xx