all natural

Luna de Miel

Now that I don’t live downtown anymore, I unfortunately don’t get out to my favourite shops as much as I would like, but when I do, I am usually delighted with amazing treats.

After a long overdue visit and as a birthday treat to myself, I made a point to pop by my very favourite beauty boutique, The Cure Apothecary  to say hello to a lovely friend and pick up some goods to rejuvenate my skin.

This winter has been so harsh on my face, leaving my skin drier than ever! I have tried everything from masks, serums, balms, etc., in hopes of revitalizing my skin and getting rid of some awful dry spots. However, I wasn’t having much luck and was feeling as though my skin was also looking a tad dull. I guess the post wedding glow does fade (haha).

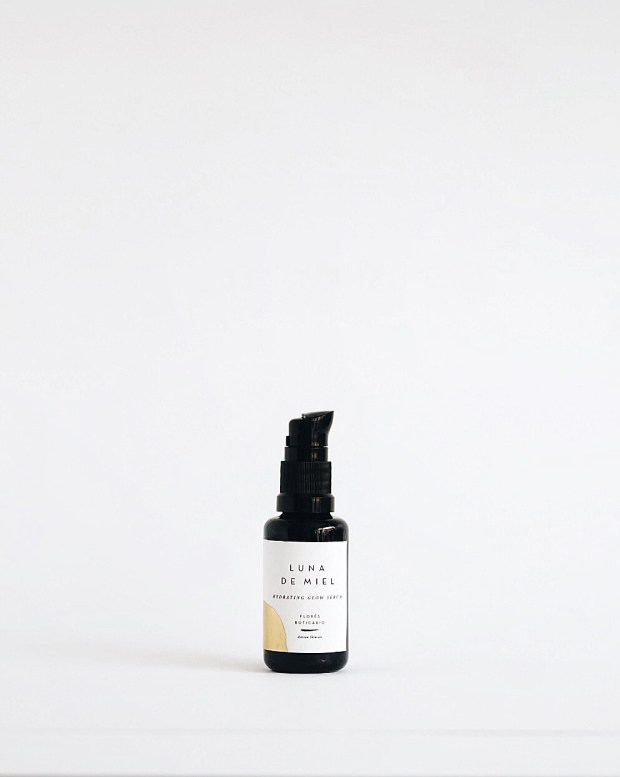
Thanks to some consultation and a wonderful recommendation, I picked up a bottle of Flores Boticario – Luna de Miel which funny enough means honeymoon in Spanish….now bring back that glow! 🙂

Luna de Miel is a beautiful silky serum made with some amazingly powerful ingredients that soak into your skin, leaving a hydrated and glowy feel. Some active key  ingredients listed on their website are:

Sea kelp bioferment meant to hydrate and moisturize
Rose water to balance
Hyaluronic acid to hydrate
Glycerin to smooth and protect against wrinkles
Pumpkin and carrot oils to give your skin a vitamin boost

Seriously, SO MUCH GOODNESS… your skin will surely thank you. And if you aren’t yet convinced, pop over to The Cure’s site for more information. Or if you’re in Toronto, be sure to pop by The Cure for all your beauty and personal care needs – you’ll be happy you did!

Luna

After only a couple weeks of use, I can’t say enough good things about this serum. It immediately jumped to the top of my skincare list and has my skin feeling and looking refreshed. It really is a must have!

One last little trick that I will leave with you when using Luna as part of your daily routine, is to combine one pump Luna with one pump of Rosehip Seed Oil. This will create a magic combination that will give your skin a super hydration boost, plus extend the life of both products. 🙂

Love your Skin. xx


Pistachio Rose Mylk

Oh lord, this is a real treat! A mylk that you won’t make all the time, but a great way to jazz up your nut mylk game. Inspired by a favourite farmer’s market find (Mylko – Rose Pistachio), this combo is perfect for the holidays! Pistachio Rose

While the Rose water is a nice touch in this recipe, it’s not completely necessary. It won’t make or break this combination! It’s fragrant and lovely and offers great benefits but it adds time and you need to be super selective with where you source your roses.

The key star in this combo is the cardamon. Not a spice I usually steer towards but in this instance it is the perfect flavour partnered with the naturally sweet pistachio milk. Adding a boost when it comes to health promoting properties and combating digestive issues.

Ingredients (yields 4-5 cups)

  • 1 cup pistachios
  • 1/4 tsp cardamon
  • 1/2 tsp cinnamon
  • 2 dates
  • Half cup rose water
  • Half cup vanilla almond mylk
  • 3-4 cups of filtered waterIngredients
  1. Place pistachios in bowl and cover with a couple inches of water. Soak nuts overnight (8 hours or longer).
  2. Rinse and drain nuts.Soaked Pistachios
  3. Select, fresh, fragrant, organic roses. Remove petals from stem and and rinse.
  4. Place rose petals in pan with a cup of water covering them. Cover pot with lid and set the heat to low.Rose Petals
  5. After about 20 -30 minutes, you will see that the water takes on the colour of the petals.Rose Petals after 20 minutes
  6. Strain petals.Rosewater
  7. Add all ingredients to blender and blend on high for 1 minute.
  8. Place cheese cloth or nut bag over a large bowl and pour milk.Pistachio Mylk + Cheese Cloth
  9. A lot of milk will filter right through, but you will need to squeeze the cloth/bag to ensure you get all the goodness into your bowl.Pistachio Rose Mylk

Drink up! xx


Barber & Fritz Dry Shampoo Puff

This Canadian Made product, Barber & Fritz Dry Shampoo Puff is a must have beauty product and makes for a great little gift.

I have never been a fan of the traditional spray dry shampoos. I either spray too little or spray too much, and usually it’s the latter. And then there’s the stickiness that comes along with each spray, that I just can’t get used to. I’m sure it works for many, but it’s just not my thing!

However, this all natural magic powder is exactly what I have been looking for. A mix of clay, flours and floral petals, this powdered puff is great to use in between washes and helps add volume and control. It really is a hair game changer and truthfully has saved me many bad hair days. The puff makes for easy use with major control in how much you need and use. It’s as simple as a couple dabs of the puff or by sprinkling the powder and rubbing it in. Plus, it lasts forever, I’ve been running about one per year!

Barber & Fritz Dry Shampoo

The natural ingredients of French lavender petals and French white clay work like magic. The dried petals are anti-fungal, antibacterial and help in cleaning the scalp and hair without the use of water. And the white clay absorbs oil and impurities, leaving the hair clean and refreshed, while adding a touch of volume. They really work as a killer combo and smell lovely!

You can order online at Barber & Fritz or at my favourite little Queen West Shop, The Cure Apothecary.

Barber & Fritz Dry Shampoo

B&F Powder Puff

xx!

Vanilla Almond Mylk

I’ve been riding the nut mylk train for a couple years now and replacing dairy milk wherever I can. I’ve always stuck to the typical retail brands such Silk, Blue Diamond, Natur-a for convenience sake and I was always a bit intimidated in trying to make my own.

But at last, after trying some amazing varieties from local retailers and vendors at my favourite farmers markets, I thought I have to give this a whirl. Surely, it couldn’t be so hard and I found myself craving, the all natural, preservative free kinds. And let’s face it, the mass produced varieties with a shelf life, really don’t offer much flavour, nutrients and often have some nasty fillers like carrageenan. This recipe proves that this creamy delicious treat really is a cinch to make and is so satisfying!

For my first attempt, I am super impressed with how it turned out. Slightly sweet and silky smooth, I can literally drink this by the glass and do note, that this is not something I would ever or have ever done with mass produced almond mylk, cow milk and or any other variety. Never have I had that urge, but THIS…THIS is TOO good!

Simple ingredients make for a naturally sweet vanilla caramel flavour.Almond Mylk Ingredients

Ingredients (yields 4 cups)

  • 1 cup of almonds, soaked
  • 3 medjool pitted dates
  • ¼ tsp of cinnamon
  • 1 vanilla bean (for intense flavour – chop up the whole bean!) or half a tsp pure vanilla extract
  • 3-4 cups of filtered water

Soaked Almonds

  1. Place almonds in bowl and cover with a couple inches of water. Soak nuts overnight (8 hours or longer).
  2. Rinse and drain nuts.
  3. Add all ingredients to blender and blend on high for 1 minute.
  4. Place cheese cloth or nut bag over a large bowl and pour milk.
  5. A lot of milk will filter right through, but you will need to squeeze the cloth/bag to ensure you get all the goodness into your bowl.
  1. Almond Mylk + Cheese ClothVanilla Almond MylkGot Mylk?! xx

Lavender Soy Candles

For the love of lavender – I am in heaven! This weekend’s market haul included some amazing dried bunches and sachets of lavender + some essential oils (lavender included of course!).Lavender

I am always on the hunt for beautiful all-natural soy candles and am often floored by the cost of one single candle. Soy candles are non-toxic, made up of natural vegetables, generally burn longer and cleaner – releasing very little soot and no carcinogens.Lavender Soy CandlesThe lovely lavender man at the Guelph Farmer’s Market, inspired me to finally make my own soy candles. Off I went to collect supplies and give it a shot.  And let me tell you it couldn’t have been any easier! Do note: supplies aren’t on the cheap side but I also didn’t bargain shop (bought wax, wicks and twine at Michaels). However, supplies are much cheaper than buying 6 soy candles at your local retailer.

For 5-6 candles (depending on size) here is what you need:

  • 4 lbs of soy wax flakes
  • glass measuring cup
  • essential oils
  • 6 candle wicks
  • 6 jars (I used mason jars)
  • 6 wood skewers
  • glue gun
  • dried lavender (in this particular case)
  • ribbon or twine to decorate jar

Candle Supplies

  1. Centre and glue the wick to the bottom of the jar. (Minimal glue is needed but if you wanted to keep these all-natural, you could secure the wick with melted wax and letting it dry. I thought of this after the fact and was trying to be as quick as possible with this project).
  2. Microwave wax flakes on high in for 8-10 minutes, keep an eye on them and give them a stir if needed. Add an extra minute or two if needed. (Timing will vary on the size of measuring cup + amount of wax used).
  3. While wax is melting, wrap the wick around a wood skewer to help keep it centred and straight.
  4. Once the wax is completely melted, add 20-40 drops of essential oil and stir. (add more or less depending on how strong you like your scents)
  5. Stir in dried lavender.
  6. Pour into jars, keeping wick straight.
  7. Once partially cooled, top with additional dried lavender.
  8. Let cool for 10-12 hours, before use.

Soy Candle Making

Soy Candle MakingLavender Soy Candles

Heavenly. xx